This weekend, I started off strong by going to the range with an old friend and then catching up over lunch. As far as the tech side of things, I broke down my serverless setup as it’s more expensive than a Wonderbox hosting containers. With that said I dusted off my nginx load balancer container, killed my ELB, and elastic ips, and retooled dns back to it’s humble roots. The following is Claude’s summary of the new features we implemented and the things we troubleshooted.
Dev work done this weekend
This weekend was a productive infrastructure and tooling sprint on the blog2/vacuumflask project. Here's a rundown of what got built and fixed.
Media Expiration System
Added a full lifecycle management system for media files. You can now set an expiration date on any file in the media library. After that date, a cleanup job removes it from S3 automatically. The expiration is stored in SQLite, visible in the media library UI with an edit button on each card, and also available at upload time. When a file is deleted manually, its expiration record is cleaned up too.
Headless API Authentication
Built a /api/login endpoint that issues a short-lived Bearer token using
VACUUMAPIKEYSALT + TOTP — no plaintext password required. This lets automated
scripts authenticate without storing credentials, using AWS Secrets Manager for the secret values
and pyotp for one-time passwords.
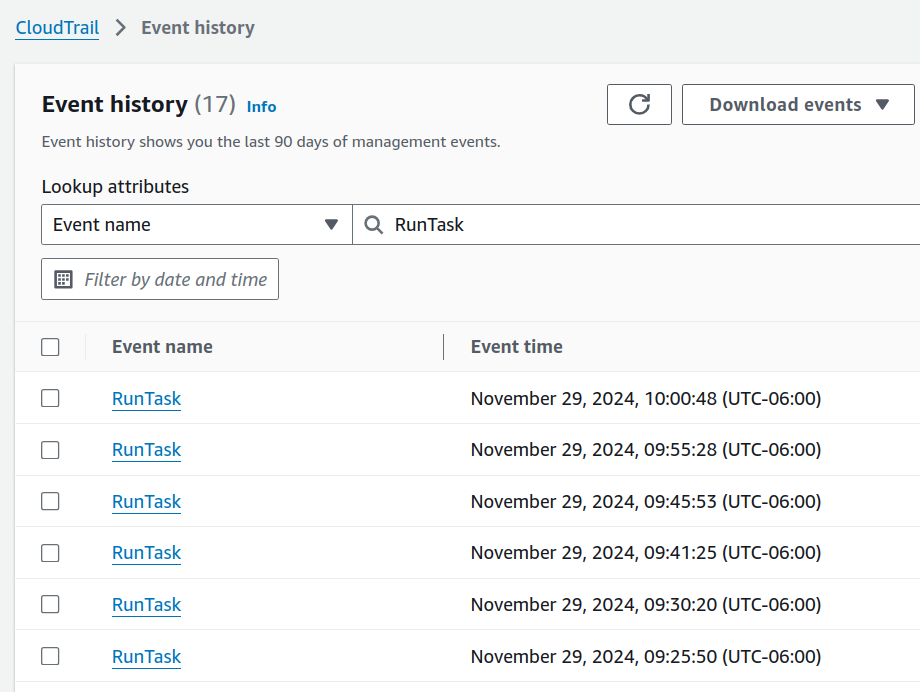
Lambda Cleanup Cron
Created cron/cleanup_expired.py — a Lambda-compatible handler that logs in via the
headless API and calls /admin/cleanup_expired. It logs structured output to
CloudWatch under the cron log group via watchtower, with each run
getting its own stream. Also ships as a local cron.sh that can be called from the
system crontab, scheduled for 12:01 AM daily.
MCP Server
Made the blog discoverable to AI assistants via the
Model Context Protocol. A FastMCP server exposes
blog posts, tags, and search as resources and tools. It runs as a Docker container with SSE
transport proxied through nginx at /mcp/, and is advertised to clients via
/.well-known/mcp.json and a tag in the page
header.
Blog Styling Modernization
Rewrote style.css with CSS variables, a sticky header, card-style post layout,
and a modernized tag cloud panel. Fixed a specificity bug where tags were rendering white-on-white,
and another where tag size weighting was overridden by the admin nav styles — so the tag cloud
now correctly reflects content volume.
Nginx + Certbot Infrastructure
Rebuilt the load balancer container to manage its own TLS certificates. On startup it generates self-signed certs so nginx can start, then immediately replaces them with Let's Encrypt certificates via the HTTP-01 webroot challenge. A cron job inside the container handles daily renewal at 3 AM and 3 PM. Certificates persist across restarts via Docker named volumes.
Redis Connection Fix
Tracked down a TimeoutError in the Redis client caused by a stale EC2 internal IP
in the server's .env file. The Flask container runs with --network=host
but Valkey runs in bridge mode, so Docker's loopback forwarding doesn't apply. The fix was to
use Valkey's Docker bridge IP (172.17.0.2) directly.

from getpass import getpass
import requests
import json
import os
import logging


logging.basicConfig(level=logging.INFO)
logger = logging.getLogger(__name__)
username = "colin@cmh.sh"
password = getpass()
session = requests.Session()
session.headers.update({
    'Accept': "application/json",
    'Content-Type': "application/json",
    'Cache-Control': "no-cache",
})


url_authn = f"{os.environ.get("OKTA_ORG_URL")}/api/v1/authn"
logger.info(f"auth URL: {url_authn}")
payload_authn = json.dumps({
    "username": username,
    "password": password,
    "options": {"warnBeforePasswordExpired": True,
                "multiOptionalFactorEnroll": True},
})
response = session.post(url_authn, data=payload_authn)
logger.info(f"auth response: {response.text}")
resp_obj = json.loads(response.text)
if resp_obj["status"] != "SUCCESS" and resp_obj["status"] != "MFA_REQUIRED":
    logger.error(f"auth response: {resp_obj["status"]}")
    raise "Login failed"
if resp_obj["status"] == "MFA_REQUIRED":
    factors = resp_obj["_embedded"]["factors"]
    logger.info(f"factors: {factors}")
    factorId = getpass(prompt="factor id: ")
    mfa_otp_url = f"{os.environ.get("OKTA_ORG_URL")}/api/v1/authn/factors/{factorId}/verify"
    #https://developer.okta.com/docs/reference/api/authn/#verify-totp-factor
    otp = getpass(prompt="OTP:")
    mfa_payload = json.dumps({
        "stateToken": resp_obj["stateToken"],
        "passCode": otp
    })
    logger.info(f"MFA URL: {mfa_otp_url}")
    mfa_resp = session.post(url=mfa_otp_url, data=mfa_payload)
    logger.info(f"mfa response: {mfa_resp.text}")
    resp_obj = json.loads(mfa_resp.text)
    if resp_obj["status"] != "SUCCESS":
        logger.error(f"mfa response: {resp_obj["status"]}")
        raise "MFA failed"
logger.info(f"Successfully logged into okta. sessionToken: {resp_obj['sessionToken']} userID: {resp_obj['_embedded']['user']['id']}")
source /media/vacuum-data/update_internal_dns_auto.sh

#Kubernetes related
sudo curl -sSL https://raw.githubusercontent.com/helm/helm/master/scripts/get-helm-3 | bash

mkdir /tmp/working
chmod 777 /tmp/working


K3S_URL=$(cat /media/vacuum-data/k3s/k3s_url)
K3S_TOKEN=$(cat /media/vacuum-data/k3s/k3s_token)

# Get the secret value and store it in a variable
secret_string=$(aws secretsmanager get-secret-value \
    --secret-id "$SECRET_ARN" \
    --query 'SecretString' \
    --output text)
# Parse the JSON and extract the values using jq
# Note: You'll need to install jq if not already installed: sudo yum install -y jq
K3S_POSTGRES_USER=$(echo $secret_string | jq -r '.K3S_POSTGRES_USER')
K3S_POSTGRES_PASSWORD=$(echo $secret_string | jq -r '.K3S_POSTGRES_PASSWORD')
POSTGRESS_SERVER=$(echo $secret_string | jq -r '.POSTGRES_SERVER')
con="postgres://$K3S_POSTGRES_USER:$K3S_POSTGRES_PASSWORD@$POSTGRESS_SERVER:5432/kubernetes"
postgres_conn_k3s=${con}
echo "postgres_conn_k3s is set to $postgres_conn_k3s"

# Download the RDS CA bundle
curl -O https://truststore.pki.rds.amazonaws.com/global/global-bundle.pem

# For k3s configuration, you'll want to move it to a permanent location
sudo mkdir -p /etc/kubernetes/pki/
sudo mv global-bundle.pem /etc/kubernetes/pki/rds-ca.pem

#ECS related
if [ -d /etc/ecs ]; then
  echo "ECS_CLUSTER=vacuumflask_workers" > /etc/ecs/ecs.config
  echo "ECS_BACKEND_HOST=" >> /etc/ecs/ecs.config
  #TODO: set hostname; set name in /etc/hosts
  #TODO: register with ALB.
fi

MAX_ATTEMPTS=60  # 5 minutes maximum wait time
ATTEMPT=0
API_URL="https://vacuumhost1.internal.cmh.sh:6443"

# Check if a k3s node is already online
response=$(curl -s -o /dev/null -w "%{http_code}" \
  --connect-timeout 5 \
  --max-time 10 \
  --insecure \
  "$API_URL")
if [ $? -eq 0 ] && [ "$response" -eq 401 ]; then
  curl -sfL https://get.k3s.io | sh -s - server \
    --token=${K3S_TOKEN} \
    --datastore-endpoint=${postgres_conn_k3s} \
    --log /var/log/k3s.log \
    --tls-san=${API_URL}
else
  # Install k3s with PostgreSQL as the datastore
  #this is only if there isn't an existing k3s node
  curl -sfL https://get.k3s.io | sh -s - server \
    --write-kubeconfig-mode=644 \
    --datastore-endpoint=${postgres_conn_k3s} \
    --log /var/log/k3s.log \
    --datastore-cafile=/etc/kubernetes/pki/rds-ca.pem \
    --token=${K3S_TOKEN} \
  #  --tls-san=${K3S_URL} \
fi


echo "Waiting for k3s API server to start at $API_URL..."

while [ $ATTEMPT -lt $MAX_ATTEMPTS ]; do
    # Perform curl with timeout and silent mode
    response=$(curl -s -o /dev/null -w "%{http_code}" \
        --connect-timeout 5 \
        --max-time 10 \
        --insecure \
        "$API_URL")

    if [ $? -eq 0 ] && [ "$response" -eq 401 ]; then
        echo "K3s API server is ready!"
        break;
    else
        ATTEMPT=$((ATTEMPT + 1))
        remaining=$((MAX_ATTEMPTS - ATTEMPT))
        echo "Waiting... (got response code: $response, attempts remaining: $remaining)"
        sleep 5
    fi
done
if [ $ATTEMPT -eq $MAX_ATTEMPTS ]; then
    echo "K3s API server did not start in time. Exiting."
    exit 1
fi

export KUBECONFIG=/etc/rancher/k3s/k3s.yaml
pwd=$(aws ecr get-login-password)
echo $pwd | sudo docker login --username AWS --password-stdin 123456789.dkr.ecr.us-east-1.amazonaws.com
kubectl delete secret regcred --namespace=default
# Create a secret named 'regcred' in your cluster
kubectl create secret docker-registry regcred \
  --docker-server=123456789.dkr.ecr.us-east-1.amazonaws.com \
  --docker-username=AWS \
  --docker-password=${pwd} \
  --namespace=default

kubectl create secret tls firstlast-tls \
  --cert=/media/vacuum-data/vacuum-lb/ssl/wild.firstlast.dev.25.pem \
  --key=/media/vacuum-data/vacuum-lb/ssl/wild.firstlast.dev.25.key \
  --namespace=default

kubectl create secret tls cmh-tls \
  --cert=/media/vacuum-data/vacuum-lb/ssl/wild.cmh.sh.crt \
  --key=/media/vacuum-data/vacuum-lb/ssl/wild.cmh.sh.key \
  --namespace=default


helm repo add traefik https://traefik.github.io/charts
helm repo update
helm install traefik traefik/traefik --namespace traefik --create-namespace
kubectl apply -f https://raw.githubusercontent.com/traefik/traefik/v2.10/docs/content/reference/dynamic-configuration/kubernetes-crd-definition-v1.yml

cd /media/vacuum-data/k3s
source /media/vacuum-data/k3s/setup-all.sh prod
user  nginx;
worker_processes  auto;

error_log  /var/log/nginx/error.log notice;
pid        /var/run/nginx.pid;


events {
    worker_connections  1024;
}


http {
    upstream vacuumflask {
        server staticendpoint:8080  max_fails=3 fail_timeout=30s;
        server dynamicendpoint:8080  max_fails=3 fail_timeout=30s;
        least_conn; # Least connections
    }
    upstream blog1
    {
        server dynamicendpoint:80  max_fails=3 fail_timeout=30s;
    }


    server {
        listen 80;
        server_name blog4.cmh.sh;
        return 301 https://$server_name$request_uri;
    }

    server {
        listen 443 ssl;
        server_name blog.cmh.sh blog4.cmh.sh;
        location / {
            proxy_pass http://vacuumflask;
            proxy_set_header Host $host;  # Add this line to forward the original host
            proxy_set_header    X-Real-IP        $remote_addr;
            proxy_set_header    X-Forwarded-For  $proxy_add_x_forwarded_for;
        }
        #proxy_set_header Host $host;
        ssl_certificate /tmp/ssl/wild.cmh.sh.crt;
        ssl_certificate_key /tmp/ssl/wild.cmh.sh.key;
        ssl_session_cache shared:SSL:1m;
        ssl_session_timeout 120m;
        ssl_protocols       TLSv1.2 TLSv1.3;
        ssl_ciphers ECDHE-ECDSA-AES128-GCM-SHA256:ECDHE-RSA-AES128-GCM-SHA256:ECDHE-ECDSA-AES256-GCM-SHA384:ECDHE-RSA-AES256-GCM-SHA384:ECDHE-ECDSA-CHACHA20-POLY1305:ECDHE-RSA-CHACHA20-POLY1305:DHE-RSA-AES128-GCM-SHA256:DHE-RSA-AES256-GCM-SHA384;
        ssl_prefer_server_ciphers off;


        # Basic security headers
        add_header Strict-Transport-Security "max-age=31536000; includeSubDomains" always;
        add_header X-Frame-Options SAMEORIGIN;
        add_header X-Content-Type-Options nosniff;
        add_header X-XSS-Protection "1; mode=block";
    }

    server {
        listen 443 ssl;
        server_name cmh.sh ots.cmh.sh;
        location / {
            proxy_pass http://blog1;
            proxy_set_header    X-Real-IP        $remote_addr;
            proxy_set_header    X-Forwarded-For  $proxy_add_x_forwarded_for;
            proxy_set_header Host $host;  # Add this line to forward the original host
        }
        #proxy_set_header Host $host;
        ssl_certificate /tmp/ssl/wild.cmh.sh.crt;
        ssl_certificate_key /tmp/ssl/wild.cmh.sh.key;
        ssl_session_cache shared:SSL:1m;
        ssl_session_timeout 120m;
        ssl_protocols       TLSv1.2 TLSv1.3;
        ssl_ciphers ECDHE-ECDSA-AES128-GCM-SHA256:ECDHE-RSA-AES128-GCM-SHA256:ECDHE-ECDSA-AES256-GCM-SHA384:ECDHE-RSA-AES256-GCM-SHA384:ECDHE-ECDSA-CHACHA20-POLY1305:ECDHE-RSA-CHACHA20-POLY1305:DHE-RSA-AES128-GCM-SHA256:DHE-RSA-AES256-GCM-SHA384;
        ssl_prefer_server_ciphers off;


        # Basic security headers
        add_header Strict-Transport-Security "max-age=31536000; includeSubDomains" always;
        add_header X-Frame-Options SAMEORIGIN;
        add_header X-Content-Type-Options nosniff;
        add_header X-XSS-Protection "1; mode=block";
    }
    server {
        listen 443 ssl;
        server_name oldblog
        location / {
            proxy_pass http://blog1;
            proxy_set_header    X-Real-IP        $remote_addr;
            proxy_set_header    X-Forwarded-For  $proxy_add_x_forwarded_for;
            proxy_set_header Host $host;  # Add this line to forward the original host
        }
        #proxy_set_header Host $host;
        ssl_certificate /tmp/ssl/wild.oldblog.dev.25.pem;
        ssl_certificate_key /tmp/ssl/wild.oldblog.key;
        ssl_session_cache shared:SSL:1m;
        ssl_session_timeout 120m;
        ssl_protocols       TLSv1.2 TLSv1.3;
        ssl_ciphers ECDHE-ECDSA-AES128-GCM-SHA256:ECtail -f /var/log/nginx/error.log
        tail -f /var/log/nginx/access.log
        DHE-RSA-AES128-GCM-SHA256:ECDHE-ECDSA-AES256-GCM-SHA384:ECDHE-RSA-AES256-GCM-SHA384:ECDHE-ECDSA-CHACHA20-POLY1305:ECDHE-RSA-CHACHA20-POLY1305:DHE-RSA-AES128-GCM-SHA256:DHE-RSA-AES256-GCM-SHA384;
        ssl_prefer_server_ciphers off;


        # Basic security headers
        add_header Strict-Transport-Security "max-age=31536000; includeSubDomains" always;
        add_header X-Frame-Options SAMEORIGIN;
        add_header X-Content-Type-Options nosniff;
        add_header X-XSS-Protection "1; mode=block";
    }

}
deploy nginx and dns config for container restart
#!/bin/bash
destination="vacuum-lb-push"
zipPrefix="vacuum-lb-"
zipFileName="$zipPrefix$(date +%Y%m%d).zip"
mkdir $destination
while IFS= read -r file; do
    cp $file $destination/$file
done < ship_list.txt
cd $destination
zip -r $zipFileName *
mv $zipFileName ../.
cd ../
rm -rf $destination
scp $zipFileName project:blog2/$zipFileName
ssh project "cd /media/vacuum-data/vacuum-lb; sudo mv /home/ubuntu/blog2/$zipFileName /media/vacuum-data/vacuum-lb/$zipFileName; sudo bash unpack.sh $zipFileName"
rm $zipFileName
- enable ip6 on the vpc
- calculate ip6 sub-net masks
- create new sub-nets that support ip 6
- create an “egress only gateway (ip6 only)”
- Add a route to allow internet traffic out through the new egress gateway.
What I quickly discovered after removing my public ip4 addresses in a vpc/subnet with no Nat-gateways (not nat gateway to save $) was that a lot of AWS services do not yet support ip6. The one that was my biggest issue was the elastic container registry.
My next project over break was to try containerize all of my old websites that were being hosted on my project box. The process of getting apache / php and my dependency chain for my project websites ended up taking several days. Much to my surprise, the tool that ended up being very useful was Amazon Q. It provided to be more useful than ChatGPT when it came to getting apache, PHP, and my dependency chain to cooperate.
Once I got my old websites containerized I set about going after some nice to haves. I set up an auto dns/tag updater so that my spawned instances would follow the pattern that would make them easy to manage. This would also allow me to eventually have totally dynamic hosting for my ECS tasks, clusters, and all of my docker needs.
#!/bin/bash version=$(date +"%Y%m%d%H%M%S") docker build --tag blog.myname.dev:$version . success=$(docker images | grep -w $version) if [ -z "$success" ]; then echo "build failed" exit 1 fi imageid=$(docker image ls | grep -w "blog.myname.dev" | awk '{print $3}') #echo "new imageid: $imageid" lastimage=$(head -1 <<< $imageid) old_containers=$(docker ps -a | grep -w "blog.myname.dev"| grep -w Exited | grep -E "months|weeks|days|hours" | awk '{print $1}') while IFS= read -r instance do docker container rm "$instance" done <<< "$old_containers" echo "cleaning up old images" while IFS= read -r image; do if [ "$image" != "$lastimage" ]; then echo "removing image: $image" docker rmi $image fi done <<< "$imageid" echo "last imageid: $lastimage" created=$(docker images | grep -w $lastimage | awk '{print $4}') echo "created: $created"#!/bin/bash img=$( docker images | grep blog.myname.dev | head -1 | awk '{print $3}') echo "running image $img" docker run -p 80:80 \ --volume /home/colin/projectbox/var/www/blog/blogdata:/var/www/blog/blogdata \ --volume /home/colin/projectbox/var/www/blog/logs:/var/log \ -e AWS_REGION=US-EAST-1 -td "$img" echo "waiting for container to start" sleep 5 contid=$(docker ps -a | grep "$img" | awk '{print $1}') echo "container id is $contid" status=$(docker ps -a | grep "$contid" | awk '{print $7}') echo "container status is $status" if [ "$status" != "Up" ]; then echo "container failed to start" docker logs "$contid" echo "removing container" docker rm "$contid" fi#!/bin/bash ZONE_ID="myzoneid" PATTERN="internal.cmh.sh." # Get all records and filter for internal.cmh.sh entries dnslist=$(aws route53 list-resource-record-sets \ --hosted-zone-id "$ZONE_ID" \ --query "ResourceRecordSets[?ends_with(Name, '$PATTERN')].[ResourceRecords[].Value | [0], Name]" \ --profile vacuum \ --output text | sed 's/\.$//') instancelist=$(aws ec2 describe-instances \ --filters "Name=tag:Name,Values=*.internal.cmh.sh" "Name=instance-state-name,Values=running" \ --query 'Reservations[].Instances[].[LaunchTime,PrivateIpAddress,Tags[?Key==`Name`].Value | [0]]' \ --output text --profile vacuum --region us-east-1 | sort) defaultinstances=$(aws ec2 describe-instances \ --filters "Name=tag:Name,Values=Vacuum-Server" "Name=instance-state-name,Values=running" \ --query 'Reservations[].Instances[].[LaunchTime,PrivateIpAddress,Tags[?Key==`Name`].Value | [0]]' \ --output text --profile vacuum --region us-east-1 | sort) instanceCount=$(wc -l <<< "$instancelist") echo "dns list: $dnslist" echo "instance list: $instancelist" bash update_dns_loop.sh "$instancelist" $instanceCount bash update_dns_loop.sh "$defaultinstances" $instanceCount#!/bin/bash if [ $# -ne 2 ]; then echo "Usage:" echo "data format: " exit 1 fi echo $1 | while read -r launchTime privateIp name; do echo "Checking $name ($privateIp)" if grep -q "$name" <<< "$dnslist"; then echo " DNS record exists" if grep -q "$privateIp" <<< "$dnslist"; then echo " IP address matches" else echo " IP address does not match" sh update_internal_dns.sh $name $privateIp fi else echo " DNS record does not exist" if [ $name == "Vacuum-Server" ]; then #will not work if more than one instance was spun up. name="vacuumhost$2.internal.cmh.sh" sh update-ec2-name-from-priv-ip.sh $privateIp $name fi sh update_internal_dns.sh $name $privateIp fi done #!/bin/bash if [ $# -ne 2 ]; then echo "Usage: $0" exit 1 fi name=$1 privateIp=$2 aws route53 change-resource-record-sets \ --hosted-zone-id myzoneid \ --change-batch '{ "Changes": [ { "Action": "UPSERT", "ResourceRecordSet": { "Name": "'"$name"'", "Type": "A", "TTL": 300, "ResourceRecords": [ { "Value": "'"$privateIp"'" } ] } } ] }' --profile vacuum --output text #!/bin/bash #!/bin/bash if [ $# -ne 2 ]; then echo "Usage: $0" exit 1 fi PRIVATE_IP=$1 NEW_NAME=$2 INSTANCE_ID=$(aws ec2 describe-instances \ --filters "Name=private-ip-address,Values=$PRIVATE_IP" \ --query "Reservations[].Instances[].InstanceId" \ --output text --profile vacuum --region us-east-1) if [ -z "$INSTANCE_ID" ]; then echo "No instance found with private IP $PRIVATE_IP" exit 1 fi aws ec2 create-tags \ --resources $INSTANCE_ID \ --tags "Key=Name,Value=$NEW_NAME" \ --profile vacuum --region us-east-1 if [ $? -eq 0 ]; then echo "Successfully updated tag for instance $INSTANCE_ID" else echo "Failed to update tag" fi
#!/bin/bash
sudo yum update
sudo yum upgrade -y
#Install EFS utils
sudo yum install -y amazon-efs-utils
#sudo apt-get -y install git binutils rustc cargo pkg-config libssl-dev gettext
#git clone https://github.com/aws/efs-utils
#cd efs-utils
#./build-deb.sh
#sudo apt-get -y install ./build/amazon-efs-utils*deb
sudo yum -y install docker
sudo systemctl enable docker
sudo systemctl start docker
#sudo yum -y install boto3
if [ ! -d /media/vacuum-data ]; then
  sudo mkdir /media/vacuum-data
fi
echo "fs-05863c9e54e7cdfa4:/ /media/vacuum-data efs _netdev,noresvport,tls,iam 0 0" >> /etc/fstab
#sudo systemctl daemon-reload
sudo mount -a

#docker start redis
aws ecr get-login-password --region us-east-1 | docker login --username AWS --password-stdin 631538352062.dkr.ecr.us-east-1.amazonaws.com
sudo docker pull 631538352062.dkr.ecr.us-east-1.amazonaws.com/cmh.sh:vacuumflask
sudo sh /media/vacuum-data/run.sh

#ECS related
if [ -d /etc/ecs ]; then
  echo "ECS_CLUSTER=vacuumflask_workers" > /etc/ecs/ecs.config
  echo "ECS_BACKEND_HOST=" >> /etc/ecs/ecs.config
  #TODO: register with the alb?
fi
I’ve spent a few weekends playing around with AWS ALBs and AWS ECS. The ALB I got working after a while messing with the security groups and eventually I found where I needed to set the permissions to allow the ALB to log to s3. It turns out the permissions are in the s3 bucket policy and you have to allow an aws account access to your bucket to write the logs. With ECS, I’ve ran into a number of issues trying to get my blog into ECS with sufficient permissions to do the things it needed to do. What’s interesting about the ECS interface is that the best way to use it is with JSON from the command line. This has some inherit issues though because it requires you to put a lot of specific information in your JSON files for your environment. Ideally if you’re checking in your source code you wouldn’t be hard coding secrets in your source. After I got the basic environment working I moved all of my secrets out of environmental variables into secrets manager where they should have been to begin with. Along the way I have learned a lot more about containers and working with environmental variables and debugging in both containers and on local environments. The basic steps to get a container running in ecs:
- get the image uploaded to a container repo
- permissions / ports
- ecs task permissions
- ecs execution permissions
- security group access to the subnets and ports in play
- create your task definition
- create your service definition
Reinvent 2024 recap
Sessions Attended:- SVS310: Learn multi-tier application architectures on Amazon ECS
- ANT342: Operate and scale managed Apache Kafka and Apache Fink clusters
- SVS218: Accelerate Python and .NET lambda functions with SnapStart
- DAT307: Gen AI incident detection & response systems with Aurora & Amazon RDS
- SUP311: Rapid detection and noise reduction using automation
- DAT405: Deep dive into Amazon Aurora and its innovations
- OPN310: Running Streamlit applications on AWS
- BSI102: What’s new with Amazon QuickSight
- NFX305: How Netflix autopilots migration from Amazon RDS to Aurora at scale
- FSI315: JPMorganChase: Real-time fraud screening at massive scale
SVS310: Learn multi-tier application architectures on Amazon ECS
- Workshop: my issue with Amazon workshops is that they give you four hours to get through everything and only 2 hours with dedicated workspace. It’s strange that they don’t provide all of the materials outside of the workshop so you can actually try and reproduce the results outside of class. They use a ton of “hacks/cheats” to speed up the process with code generation.
ANT342: Operate and scale managed Apache Kafka and Apache Fink clusters
Takeaway: Use the managed Kafka service and express brokers. Large can do 45Mb/s
No disruption on scale up
Re-balancing takes minutes
90% faster recovery from failures
Fink – dev tools for streaming datastream api
session notes
SVS218: Accelerate Python and .NET lambda functions with SnapStart
Allows lambda functions 3x faster start times by caching ram/storage. Apps need to be snapstart aware for maximum speed. Works really well with Python 3.12 and later and .net 8+.
https://github.com/aws/snapshot-restore-py
https://nuget.org/packages/Amazon.Lambda.Core
Need to be careful with unique values so they don’t end up getting cached by snapstart and reused.
Be mindful of DNS caching, pulling creds too soon, network connections, ephemeral data.
$3.9 per GB and $1.4 per gb restored with 10k restores
session notes
DAT307: Gen AI incident detection & response systems with Aurora & Amazon RDS
This was a workshop where again they were using a lot of command line hacks and there wasn’t nearly enough time to get through it.
SUP311: Rapid detection and noise reduction using automation
Use automation if you don’t want to drown in incident response at scale.
I walked out
session notes
DAT405: Deep dive into Amazon Aurora and its innovations
Very cool session. I was like “a kid in a candy store” listening to the presenter talk about how Aurora works under the hood. Not an empty seat in the session. I didn’t take notes, only captured slides. Very cool.
presentation on youtube
OPN310: Running Streamlit applications on AWS
Streamlit is very slick for presenting data
Check out the “AWS Samples” github
ALB Auth is the fastest way to get authentication into Streamlit
Any time I walked into a session and saw a whiteboard, I knew I was in trouble. Smart people have a habit of being lazy when it comes to preparing for speaking engagements. What ends up happening is a random flow of presentation and time wasted waiting for them to draw visuals on the whiteboard.
session notes
BSI102: What’s new with Amazon QuickSight
Very slick demo of QuickSight
Will carefully consider Quicksight vs Streamlit for presenting my data at work.
QuickSight can do shareable dashboards via link
20GB of “spice” is the default. QuickSight looks cool but the pricing strikes me as sketchy. That is just my opinion. It can now do AI based generated dashboards and reports. They didn’t get into what percent of data/results is hallucinated by the AI. The demo had a lot of wizbang, but not how they set up all the inputs to get the results. Can use word docs as source for AI analysis which is slick. They claim 9-10x productivity gains by data analysts. In the demo they did real time analysis of data using AI. Pricing $50/user/mo for pro. Read only was $3/user/mo
https://democentral.learnquicksight.online
https://aws.amazon.com/quicksight/q/
session notes
youtube
NFX305: How Netflix autopilots migration from Amazon RDS to Aurora at scale
This was half Q/A with the audience and they used a whiteboard. They get a pass because they didn’t work for Amazon and everyone was curious to hear about what was under the hood at Netflix. Netflix has something like 2k database clusters in various amounts based on all the popular tech. This talk was focused on upgrading aurora postgresql. They used a CI/CD tool for “customer” self service and automated rollback of postgress updates. I think they said the tool they used was spinnaker.io
https://spinnakes.io/docs/setup/other_config/ci/
Sounded like they said “spincut” or something like that, I need to email them and ask the speakers for clarification.
The secret sauce for their “customer” based self upgrade service was a custom data access layer that all the customers implemented that allows Netflix to swap out database dns on the fly without “customer” intervention. session notes
FSI315: JPMorganChase: Real-time fraud screening at massive scale
This sessions name wasn’t quite what the content of the session really was but I liked it all the same. It was more about the AWS infrastructure that chase used for their massive fraud detection system. The takeaway is they use many layers of AWS services in orchestra together to auto scale and make it possible for their analysis to add new checks / features without involving the engineering teams. session notes
 So I went and edited the rule and cleaned up this error, and started cycling through all of my configuration issues. In the end I created a new SecurityGroup to allow traffic for the ECS containers, specifying the subnets it should use, and insured that it was setup to launch with fargate.
Demo:
So I went and edited the rule and cleaned up this error, and started cycling through all of my configuration issues. In the end I created a new SecurityGroup to allow traffic for the ECS containers, specifying the subnets it should use, and insured that it was setup to launch with fargate.
Demo:
The actual code to implement WatchTower in my code:
# Configure the Flask logger
logger = logging.getLogger(__name__)
cloud_watch_stream_name = "vacuum_flask_log_{0}_{1}".format(platform.node(),timeobj.strftime("%Y%m%d%H%M%S"))
cloudwatch_handler = CloudWatchLogHandler(
    log_group_name='vacuum_flask',  # Replace with your desired log group name
    stream_name=cloud_watch_stream_name,  # Replace with a stream name
)
app.logger.addHandler(cloudwatch_handler)
app.logger.setLevel(logging.INFO)
IAM permissions required
{
    "Version": "2012-10-17",
    "Statement": [
        {
            "Effect": "Allow",
            "Action": [
                "logs:CreateLogGroup",
                "logs:CreateLogStream",
                "logs:PutLogEvents",
                "logs:DescribeLogStreams"
            ],
            "Resource": "*"
        }
    ]
}
Finishing touches
The last thing that proved to be an issue was that boto3 couldn’t find the default region in my containers. This has come up before but today was I was able to find a way around it by adding a default aws cli config file to my deployment and telling boto3 where to find it by using the environment variable AWS_CONFIG_FILE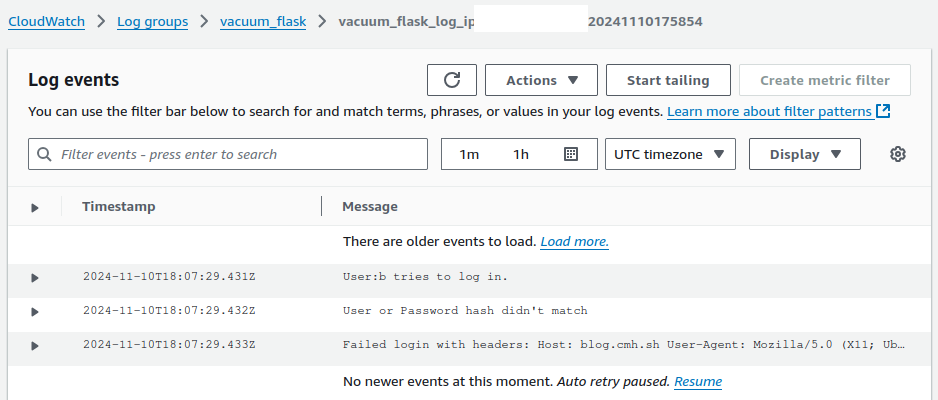
if [] if [[]] if [ $() ];At the end of the day one of my guys figured it out.
#!/bin/bash
secretobj=$(aws secretsmanager get-secret-value --secret-id "product/service/reporting" --region us-east-1)
rptpassword=$(echo $secretobj | jq ".SecretString" | sed 's/\\//g' | sed -E 's/^"//; s/"$//' | jq ".password" | sed -E 's/^"//; s/"$//' )
logfilename="service-report-log_$(date +'%Y-%m-%d').log"
echo "starting report run $(date '+%Y%m%d')" > "$logfilename"
ls service-reports | sort > existingfiles.txt
allfiles=$(sshpass -p "$rptpassword" sftp -oBatchMode=no -b - service-reports << !
cd ppreports/outgoing
ls
exit
!
)
#cleanup output from sftp server
echo "$allfiles" | sed -e '1,/^sftp> ls$/d' -e '/^sftp> cd ppreports\/outgoing$/d' -e '/^sftp> exit/d' | sort > allfiles.txt
echo "all files on server:\n $allfiles" >> "$logfilename"
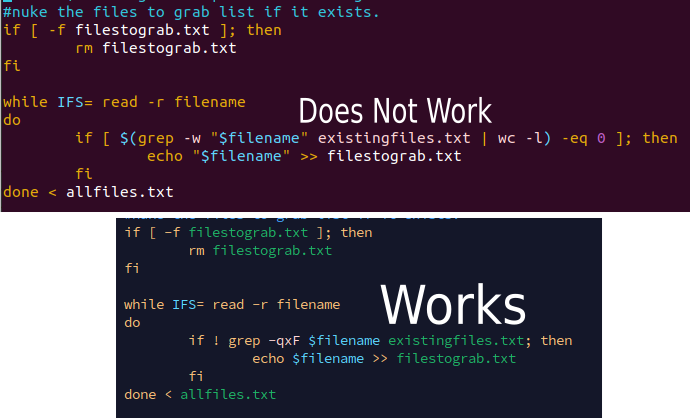
#nuke the files to grab list if it exists.
if [ -f filestograb.txt ]; then
rm filestograb.txt
fi
while IFS= read -r filename
do
if ! grep -qxF $filename existingfiles.txt; then
echo $filename >> filestograb.txt
fi
done < allfiles.txt
comm -23 allfiles.txt existingfiles.txt > filestograb2.txt
if [ -f filestograb.txt ]; then
echo "files to grab:\n" >> "$logfilename"
cat filestograb.txt >> "$logfilename"
echo "starting scp copy\n"
while IFS= read -r filename
do
sshpass -p "$rptpassword" scp service-reports:ppreports/outgoing/$filename service-reports/$filename
done < filestograb.txt
else
echo "No files missing?"
fi
echo "ending report run $(date '+%Y%m%d')" >> "$logfilename"
This weekend, I spent some time trying to look for patterns in what should be random file names. I started the process by writing some Python to read a text file with the results of an s3 ls command, break the file name into pieces for each character of the file name, and insert it into an SQLite3 database. I used some new-to-me bash techniques for code generation using a command line for loop. Along with an older sql creation by sql. This with the newer execute a command for each file line and I was in business.
#add column numbers
#for f = 1 to 50
#add 50 columns named f1 to f50
for f in {1..50}
do
  sqlite3 fileanalysis.db "alter table files add column f$f text;"
done


#loop for f = 1 to 48:
#loop for dynamic sql insert statements in mass
for f in {1..48}
do
  sqlite3 control.db "insert into file_name_position_charecter_counts (f,charecter) select distinct 'f$f', f$f from files order by f$f";
done

#loop through sql generating sql and run against our sqlite3 database.
while IFS= read -r sql
do
	sqlite3 control.db "$sql" > sqllog.txt
done < control_counts.tsv
--Create update statements to do charecter counts
select 'update file_name_position_charecter_counts set count=(select count(*) from files where '
           || c.f || '=''' || c.charecter || ''') where id = ' || cast(c.id as text)
from file_name_position_charecter_counts c;
So this week has been a lot. I can’t talk about most of it but there was a lot of good bash script to come out of it. Today also marks the end of the road for one of my favorite people on this planet, my Grandpa CL. May he rest in piece. This is for test best as he wasn’t doing well and If I somehow make it to 99, I hope I can go out in my own home just like him. So back to this weeks work:
New to me this week:
- Reading load balancer logs
- Sed on Mac is different than GNU Sed. Props to homebrew for gsed to mac.
- Finding and cat’ing all files recursively in folders
- Using awk to count things
- doing math on the command line
- merge files line by line with paste
- wc -l #count the lines in a file
- du -sh path to dir to size
#grab the file list from all the s3 buckets:
#!/bin/bash
echo "Searching"
while IFS= read -r bucket
do
	if  [ ! -f "bucket_contents/$bucket.txt" ]; then

		echo "Grabbing bucket: $bucket"
		aws s3 ls "s3://$bucket" --recursive --profile events > "bucket_contents/$bucket.txt"
	fi

done < gs_buckets.txt

#Loop through buckets and grep for matching file names.
#!/bin/bash
echo "Searching"
while IFS= read -r bucket
do
if [ -f "bucket_contents/$bucket.txt" ]; then

echo "Searching bucket: $bucket"
while IFS= read -r filename
do
cat "bucket_contents/$bucket.txt" | gsed -E 's/^[0-9-]+\s+[0-9:]+\s+[0-9]+\s+//' | grep -e "$filename" >>filelog.txt
done < filelist.txt
fi
done < gs_buckets.txt

#Mac Sed != Linux Sed

#Cat all of the files in all of the folders
find . -type f -exec cat {} +

#Read all files from an aws load balancer, return code 200
 find . -type f -exec cat {} +  | awk '{print $10 ","  $12 "," $13}' | grep -w 200 | sort | uniq -c | sort | awk '{print $1 "," $2}' > ../test.csv

#Take the port number off an ip address
gsed -E 's/:[0-9]+,/,/'

# Use AWK to count the number of lines between two numbers in a file.
#!/bin/bash
if [ $# -eq 3 ]; then
	topNo=$1
	botNo=$2
	total=$3
	date
	echo "Remaining:"
	left=$(awk -F'/' '{print $2}' movedir.txt | \
	awk -v top="$topNo" -v bottom="$botNo" '$1 > bottom && $1 <= top {count++} END {print count}')
	echo "There are $left directories left to process"
	#Do math and output the result
	pctleft=$(bc -l <<< "1-($left/$total)")
	echo "$pctleft complete"

else
	echo "(top no) (bottom no) (total)"
fi
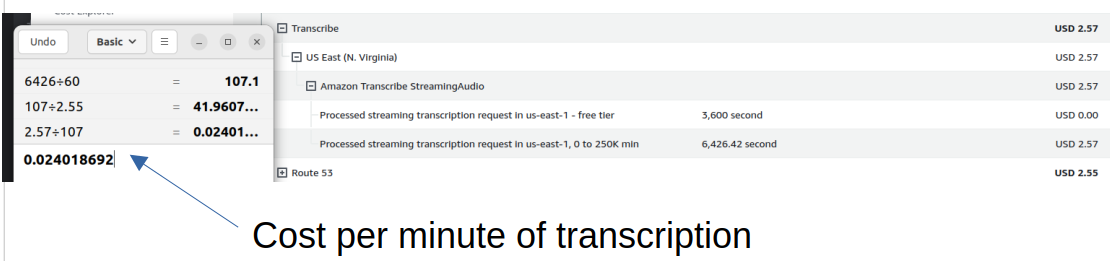
Today’s focus was on getting closed captioning working for Raphael bot. The solution ended up being switching the type of text I was creating and not worrying about the layout and location of the text. Left to the user to adjust the text location, adding the code to send all the transcriptions to the stream was not a big deal. The rest of my time was spent cleaning up the code and documentation. I also dropped a comment on my tiktok showing off the bot on tik-tok that the source code was available on GitHub. The other thing that I learned today was that Raphael is too expensive for most full time twitch streamers. I also dropped a comment on my TikTok showing off the bot on TikTok that the source code was available on GitHub.. The AWS transcription service costs about $0.024 cents per minute. This means that a typical full-time Twitch streamer would spend over $40 a week just on the transcription service. I suppose it’s a good thing that the code is open-source.
This week has seen a lot of my spare time trying to finish solving a problem I encountered at last weekend's tail end. Why my EC2 vm with an IAM profile that should grant it access to an s3 bucket can’t use the AWS PHP SDK to connect to the S3 bucket. I kept getting variations of this exception:
| [Fri Jun 28 22:47:50.774779 2024] [php:error] [pid 38165] [client 1.2.3.4 :34135] PHP Fatal error: Uncaught Error: Unknown named parameter $instance in /home/notarealuser/vendor/aws/aws-sdk-php/src/Credentials/CredentialProvider.php:74\nStack trace:\n#0 /home/notarealuser/vendor/aws/aws-sdk-php/src/Credentials/CredentialProvider.php(74): call_user_func_array()\n#1 /home/notarealuser/vendor/aws/aws-sdk-php/src/ClientResolver.php(263): Aws\\Credentials\\CredentialProvider::defaultProvider()\n#2 /home/notarealuser/vendor/aws/aws-sdk-php/src/AwsClient.php(158): Aws\\ClientResolver->resolve()\n#3 /home/notarealuser/vendor/aws/aws-sdk-php/src/Sdk.php(270): Aws\\AwsClient->__construct()\n#4 /home/notarealuser/vendor/aws/aws-sdk-php/src/Sdk.php(245): Aws\\Sdk->createClient()\n#5 /var/www/blog/s3upload.php(35): Aws\\Sdk->__call()\n#6 {main}\n thrown in /home/notarealuser/vendor/aws/aws-sdk-php/src/Credentials/CredentialProvider.php on line 74 |
I didn’t want to but I ended up adding the aws cli to my test box and confirmed that I could indeed access my aws bucket without using any hard coded credentials on the box using the IAM profile for the ec2 running this code. I ended up calling the AWS CLI from my code directly. This isn’t ideal, but I’ve wasted enough time this week fighting with this bug. In other news ChatGPT is pretty fantastic at writing regular expressions and translating english into sed commands for processing text data. Because I had to use the AWS CLI, I was getting the contents of my S3 Bucket back as text that wasn’t in a format that was ideal for consuming by code. Here is the prompt I used and the response.

I validated that the sed was correct on the website https://sed.js.org/

ChatGPT also provided a useful breakdown of the sed command that it wrote. 
One more tool for my toolbox for working with files in nix environments.