Second Conflict is a 1991 turn-based space strategy game for Windows 3.x, written in Borland C++
by Jerry W. Galloway. Up to ten factions compete to conquer a galaxy of 26 star systems,
dispatching fleets, managing planetary production, and grinding through attritional ship-to-ship
combat. The executable — SCW.EXE — is a 16-bit Windows NE binary that has never had
its source released. This post documents how we reverse-engineered the game's file formats,
mechanics, and UI from scratch, then rebuilt the whole thing in Python and pygame.
1. Starting Point — Why Ghidra?
The project began with a single goal: faithfully preserve the game's mechanics,
not just make something inspired by it. That means reading the actual binary.
Ghidra, the NSA's open-source reverse-engineering
framework, handles 16-bit NE executables well enough to produce readable pseudo-C for most
functions. We exported the full decompilation — 25,826 lines across 538 functions — into
decomp_scw.txt and used it as the authoritative reference throughout.
The core workflow was: find a dialog or behavior in the running game, locate the corresponding
Windows message handler in the decompilation (Ghidra labels them FUN_XXXX_YYYY),
read the pseudo-C, and translate that logic into Python. Where the decompiler output was
ambiguous we went back to the raw hex.
The original's dialog box identifiers (e.g.COMBATPAUSEDLG,REINFVIEWDLG) were recoverable from the NE resource table strings, which gave us reliable anchor points to search the decompilation.
2. Decoding the Save-File Format
Before writing any game logic we had to be able to read and write the original
.SCN/.SAV save files. The loader function
(FUN_1070_013f) reads ten sequential sections:
| Section | Size (bytes) | Contents |
|---|---|---|
| Header | 18 | Star count, sim-steps per turn, version 0x0300 |
| Stars | 99 × 26 = 2,574 | Star records with TLV garrison entries |
| Fleets in transit | 21 × 400 = 8,400 | Fleet records; 0xFF = free slot |
| Players | variable | 9-byte name + 27 × uint16 attributes |
| Event log | variable | Past-turn event strings |
| … | … | Misc state sections |
Several false starts happened here. The player record layout was initially read backwards — attributes came before the name in our first pass, not after. Star 0 turned out to use different field offsets than stars 1–25 (its coordinates are at bytes 9–10 rather than 1–2). These were caught by diffing known scenario files against parsed output until every field matched.
TLV garrison encoding
Each star's garrison (the ships defending it) is stored as a sequence of 7-byte
Type-Length-Value records. Each entry encodes a faction ID, ship type, and count.
The parser walks these until it hits a terminator byte, building a list of
GarrisonEntry objects that the engine then queries by ship type.
# From scenario_parser.py — reading one garrison entry
ship_type  = data[off]
faction_id = data[off + 1]
ship_count = struct.unpack_from('
3. Extracting Original Bitmaps from the NE Executable
The game's artwork lives inside SCW.EXE and SCWTIT.DLL
as NE resources. The complication: Windows NE DIB resources are stored
without the 14-byte BITMAPFILEHEADER that modern tools expect.
We wrote a parser in assets.py that walks the NE resource table directly:
- Read the NE header offset from the MZ stub at byte 0x3c.
- Follow the resource table pointer inside the NE header.
- Find entries of type
0x8002(RT_BITMAP). - Apply the alignment shift from the resource table header to get the true file offset and length.
- Prepend a synthesised
BITMAPFILEHEADER(calculating the pixel-data offset as14 + hdr_size + palette_entries × 4). - Load the result via
pygame.image.load(io.BytesIO(header + dib_data)).
Star sprites are stored as white-on-black 15×15 bitmaps, which made tinting trivial:
pygame.BLEND_RGB_MULT multiplies each pixel by the player's faction colour,
turning white into any desired hue. The title screen art (288×360) is pulled from
SCWTIT.DLL and shown in the About dialog when the DLL is present;
the dialog degrades gracefully to text-only otherwise.
# assets.py — tinting a white sprite to player colour
surf = base_sprite.copy()
tint = pygame.Surface(surf.get_size())
tint.fill(player_colour)
surf.blit(tint, (0, 0), special_flags=pygame.BLEND_RGB_MULT)
return surf
4. Game Engine
The engine lives under second_conflict/engine/ and is deliberately
stateless — every function takes the GameState dataclass and mutates
it in place, matching the original's single shared-memory model.
turn_runner.py — orchestrates one full turn
combat.py — warship attrition & combat records
production.py — per-planet ship production
fleet_transit.py— dispatch & advance fleets
revolt.py — loyalty decay & planet revolts
events.py — human-readable event log
distance.py — star-to-star travel time
Combat
The original game resolves combat as multiple rounds of attrition between
the attacking warships (any fleet arriving at an enemy star) and the defending
warships (always the star's current owner's garrison). Each round a random
fraction of each side is destroyed — the exact formula derived from the
decompiled _attrition function.
Combat produces a CombatRecord dataclass — attacker/defender factions,
initial and final ship counts, a list of per-round (atk_hit, def_hit)
tuples, and the winning faction. turn_runner.py returns these records
alongside the event log so the UI can animate them.
star.owner_faction_id, mirroring
what the original does.
Ship types
The original game has seven ship types. One caused confusion during RE:
planet type 'S' in the scenario file was initially labelled "Scout" in our
model. Cross-referencing the production dialog switch-case
(offset +0x55 in the star record) with the scout-launch code revealed
that offset stores StealthShip counts — so planet type S produces StealthShips,
not scouts. Probe ships fill the scout role.
| ID | Name | Planet type |
|---|---|---|
| 1 | WarShip | W |
| 2 | StealthShip | S |
| 3 | Transport | T |
| 4 | Missile | M |
| 5 | Scout | C |
| 6 | Troopship | — |
| 7 | Probe | P |
5. The UI — Translating Windows Dialogs to pygame
The original game is a classic Windows 3.x dialog-heavy application. Every interaction
— viewing your planets, dispatching a fleet, reading combat results — happens in a
modal dialog box. We translated each WNDPROC into a Python class inheriting
from BaseDialog, which handles the common pattern of: draw a bordered
panel, render text rows, handle mouse hover/click on buttons, close with a return value.
| Original ID | Python class | Purpose |
|---|---|---|
| ADMVIEWDLG | AdminViewDialog | All owned planets with ship counts |
| SCOUTVIEWDLG | ScoutViewDialog | Intelligence on enemy/neutral systems |
| REINFVIEWDLG | ReinfViewDialog | Incoming friendly fleets |
| REVOLTVIEWDLG | RevoltViewDialog | Planets at revolt risk |
| COMBATPAUSEDLG | CombatPauseDialog | Continue / Skip All between rounds |
| COMBATWNDPROC | CombatAnimation | Animated per-round battle replay |
| FLEETVIEWDLG | FleetViewDialog | All fleets in transit |
| PRODLIMITDLG | ProdLimitDialog | Set production per planet type |
| UNRESTVIEWDLG | UnrestDialog | Loyalty across all factions |
| … | … | … |
Combat animation
CombatAnimation is the most complex dialog. It replays a full
CombatRecord visually: ship dots (using extracted sprites,
tinted to each faction's colour) are scattered across a split battle area,
and each combat round plays out as a phase sequence:
def _build_phases(self):
    phases = [('scatter', 600)]          # ships fly to positions
    for r in range(len(self.record.rounds)):
        phases += [
            (f'r{r}_red',    500),       # casualties highlighted red
            (f'r{r}_yellow', 350),       # dying ships turn yellow
            (f'r{r}_clear',  300),       # dead ships removed
        ]
    phases.append(('result', 0))         # outcome — wait for click
    return phases
Dots are drawn as alive (tinted sprite), dying (yellow rect), or simply absent. The state machine advances automatically on a timer, pausing at 'result' until the player clicks.
6. AI Players
Two AI layers exist. The Empire AI controls the neutral Empire faction — a standing enemy that pressures all players throughout the game. The Player AI handles CPU-controlled player factions in single-player games, making fleet dispatch and production decisions each turn based on heuristics derived from the original's behaviour.
7. Project Structure
model/ — GameState, Star, Fleet, Player dataclasses
engine/ — pure game logic (no pygame)
io/ — scenario_parser: read/write .SCN files
ui/
dialogs/ — 15+ modal dialog classes
map_view.py — interactive star map
side_panel.py — right-hand fleet/turn panel
sys_info_panel.py— selected star details
ai/ — empire_ai.py, player_ai.py
assets.py — NE resource parser, sprite cache
main.py — entry point, menu bar, event loop
The model and engine layers have no pygame dependency at all, which kept testing straightforward and would allow a headless server mode.
8. Lessons Learned
- Trust the binary, not assumptions. Several fields were initially wrong because we assumed typical game layouts. The decompilation always won arguments.
- NE resources are not PE resources. The 16-bit Windows NE format predates the PE format and has a completely different resource table structure. DIB bitmaps stored inside it lack the file header that modern tools expect — synthesising it from the DIB's own info header is the only way to load them.
-
White sprites are a tinting gift. If the original artist drew
ship and star sprites in white-on-black,
BLEND_RGB_MULTgives you faction colouring for free. No palette hacks required. - Stateless engine functions pay off. Keeping all game logic as pure functions over a serialisable state dataclass made save/load trivial and prevented entire classes of bugs where UI and model drifted out of sync.
-
Name things from the source. Using the original dialog IDs
(
ADMVIEWDLG,REINFVIEWDLG, etc.) as class-level docstring references meant that whenever something looked wrong, there was an unambiguous pointer back to the relevant decompiled function.
What's Next
The remaining work is mostly filling in edges: fog-of-war is not yet implemented (currently all stars are visible to all players), the diplomacy system is stubbed out, and a few of the original's more obscure mechanics — missile fleet speed bonuses, troopship boarding combat — are approximated rather than exact. The save-file round-trip is complete, which means existing original scenario files load and play correctly.
SCW.EXE is present
on the user's machine the engine will extract and use the original sprites,
otherwise it falls back to procedural graphics.
 Source Code
from getpass import getpass
import requests
import json
import os
import logging


logging.basicConfig(level=logging.INFO)
logger = logging.getLogger(__name__)
username = "colin@cmh.sh"
password = getpass()
session = requests.Session()
session.headers.update({
    'Accept': "application/json",
    'Content-Type': "application/json",
    'Cache-Control': "no-cache",
})


url_authn = f"{os.environ.get("OKTA_ORG_URL")}/api/v1/authn"
logger.info(f"auth URL: {url_authn}")
payload_authn = json.dumps({
    "username": username,
    "password": password,
    "options": {"warnBeforePasswordExpired": True,
                "multiOptionalFactorEnroll": True},
})
response = session.post(url_authn, data=payload_authn)
logger.info(f"auth response: {response.text}")
resp_obj = json.loads(response.text)
if resp_obj["status"] != "SUCCESS" and resp_obj["status"] != "MFA_REQUIRED":
    logger.error(f"auth response: {resp_obj["status"]}")
    raise "Login failed"
if resp_obj["status"] == "MFA_REQUIRED":
    factors = resp_obj["_embedded"]["factors"]
    logger.info(f"factors: {factors}")
    factorId = getpass(prompt="factor id: ")
    mfa_otp_url = f"{os.environ.get("OKTA_ORG_URL")}/api/v1/authn/factors/{factorId}/verify"
    #https://developer.okta.com/docs/reference/api/authn/#verify-totp-factor
    otp = getpass(prompt="OTP:")
    mfa_payload = json.dumps({
        "stateToken": resp_obj["stateToken"],
        "passCode": otp
    })
    logger.info(f"MFA URL: {mfa_otp_url}")
    mfa_resp = session.post(url=mfa_otp_url, data=mfa_payload)
    logger.info(f"mfa response: {mfa_resp.text}")
    resp_obj = json.loads(mfa_resp.text)
    if resp_obj["status"] != "SUCCESS":
        logger.error(f"mfa response: {resp_obj["status"]}")
        raise "MFA failed"
logger.info(f"Successfully logged into okta. sessionToken: {resp_obj['sessionToken']} userID: {resp_obj['_embedded']['user']['id']}")
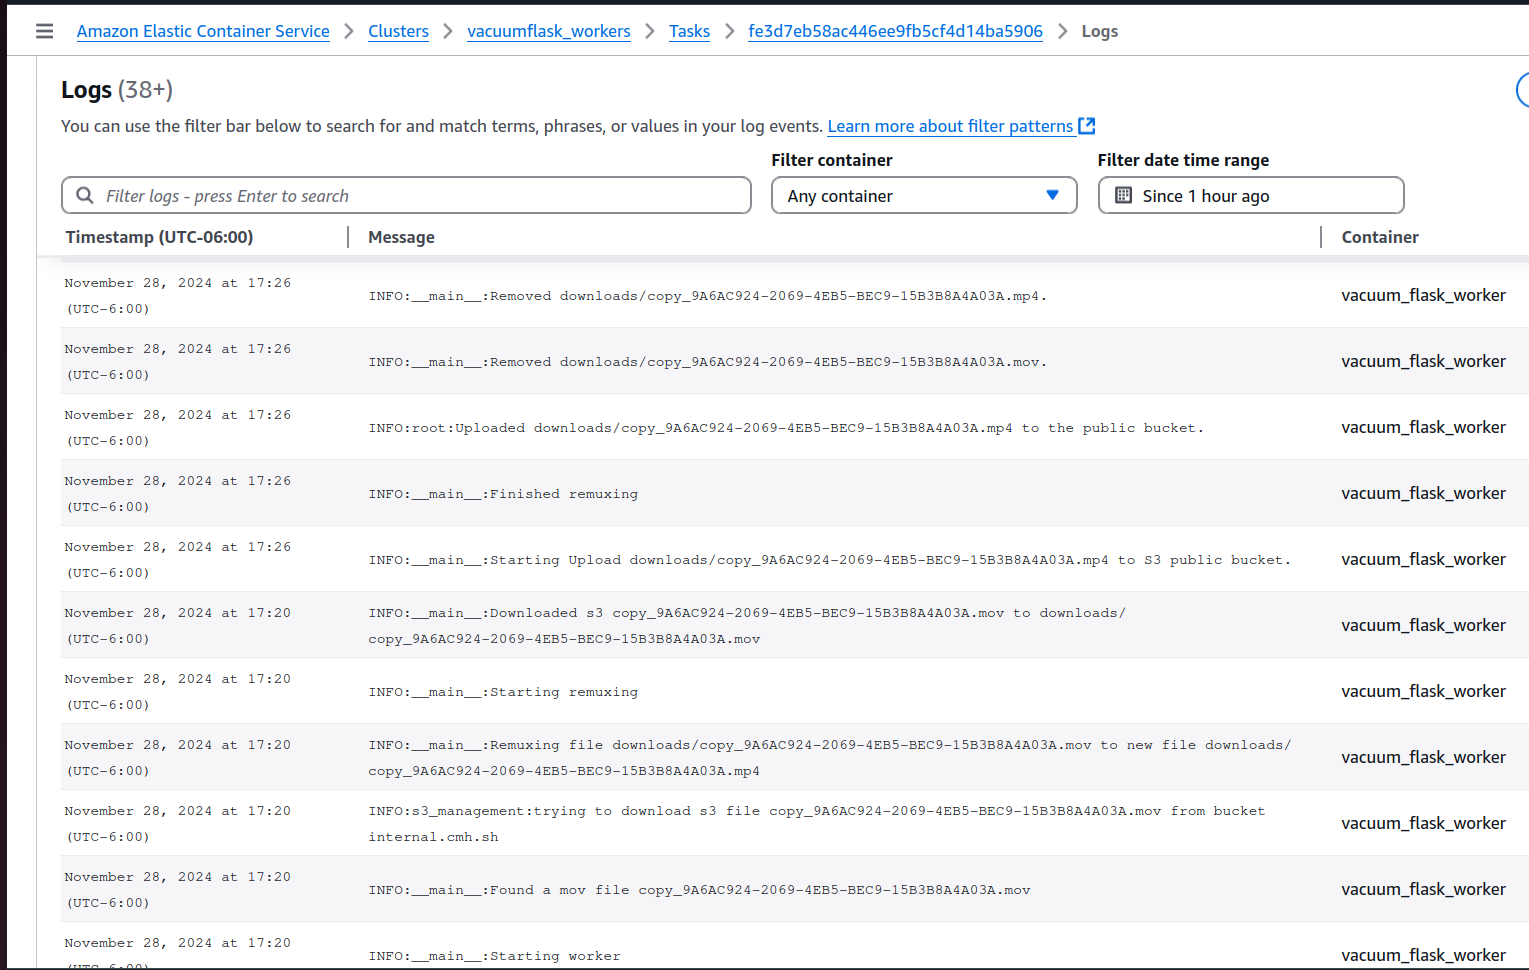
The actual code to implement WatchTower in my code:
# Configure the Flask logger
logger = logging.getLogger(__name__)
cloud_watch_stream_name = "vacuum_flask_log_{0}_{1}".format(platform.node(),timeobj.strftime("%Y%m%d%H%M%S"))
cloudwatch_handler = CloudWatchLogHandler(
    log_group_name='vacuum_flask',  # Replace with your desired log group name
    stream_name=cloud_watch_stream_name,  # Replace with a stream name
)
app.logger.addHandler(cloudwatch_handler)
app.logger.setLevel(logging.INFO)
IAM permissions required
{
    "Version": "2012-10-17",
    "Statement": [
        {
            "Effect": "Allow",
            "Action": [
                "logs:CreateLogGroup",
                "logs:CreateLogStream",
                "logs:PutLogEvents",
                "logs:DescribeLogStreams"
            ],
            "Resource": "*"
        }
    ]
}
Finishing touches
The last thing that proved to be an issue was that boto3 couldn’t find the default region in my containers. This has come up before but today was I was able to find a way around it by adding a default aws cli config file to my deployment and telling boto3 where to find it by using the environment variable AWS_CONFIG_FILE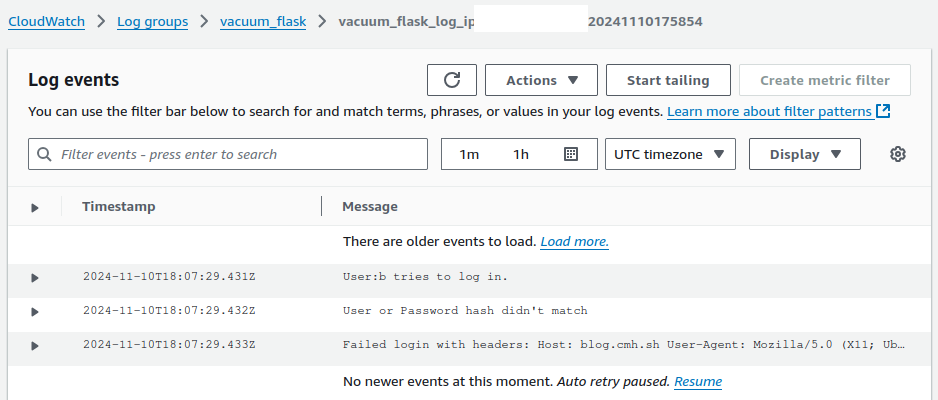
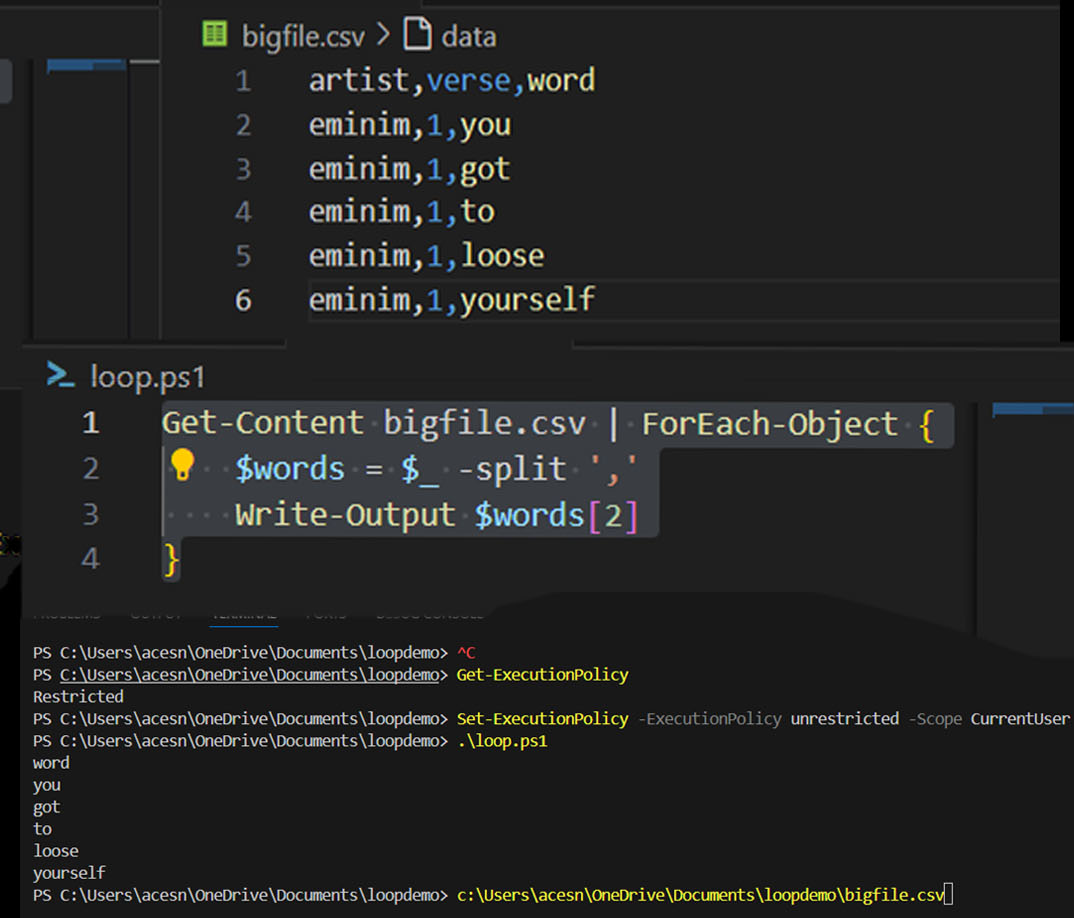
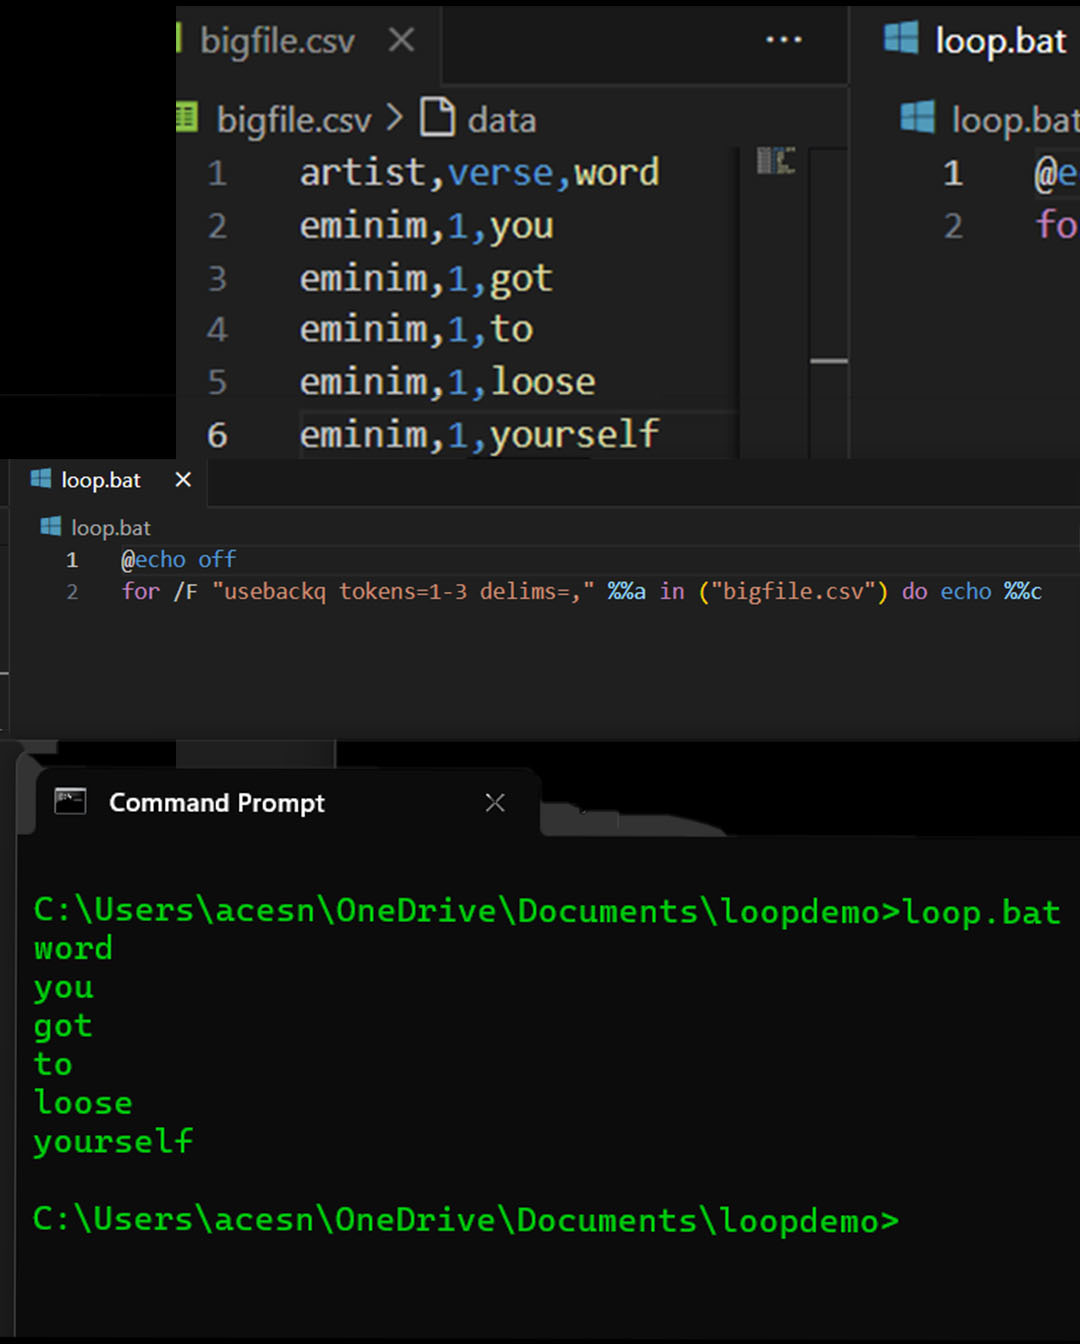
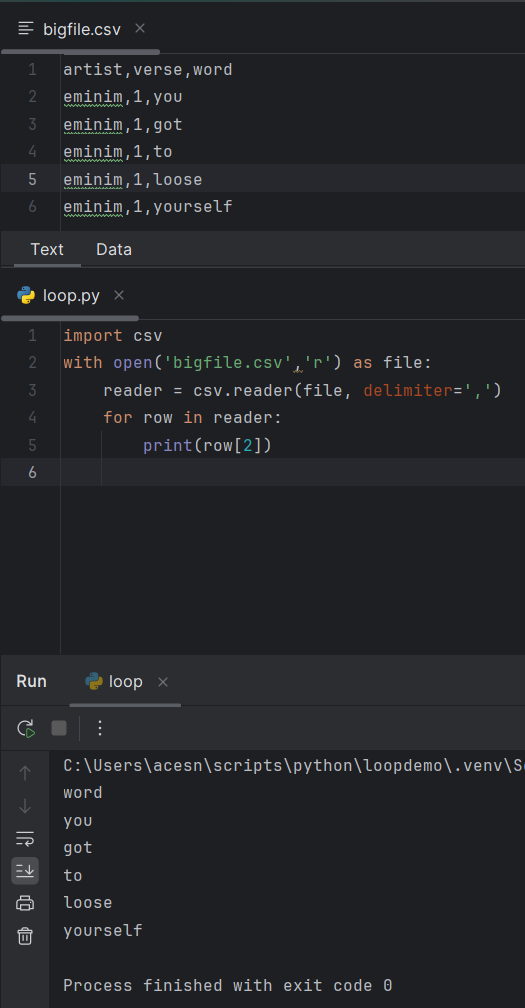
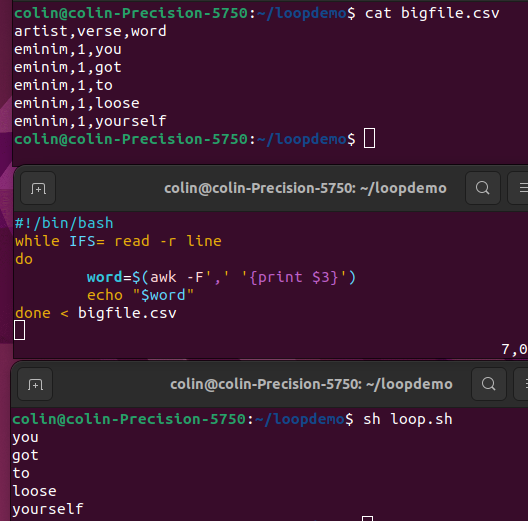
The data
| artist | verse | word |
| eminim | 1 | you |
| eminim | 1 | got |
| eminim | 1 | to |
| eminim | 1 | loose |
| eminim | 1 | yourself |
PowerShell
Get-Content bigfile.csv | ForEach-Object {
$words = $_ -split ','
Write-Output $words[2]
}
- Redis for shared server session state
- Added health checks to the apache load balancer
- Added EFS, docker, and the required networking to the mail server.
- Fixed issue with deployment pipeline not refreshing image
- Limited main page to 8 posts and added links at the bottom to everything else so it will still get indexed.
def listen_local(self):
        loop = asyncio.get_event_loop()
        print("Firing off Flask")

        thread1 = threading.Thread(target=lambda: self.myWebServ.run(
            host=self.config_data["flask_host_ip"], port=self.config_data["flask_host_port"],
            use_reloader=False, debug=True), args=()).start()
        #self.myWebServ.run()
        self.myWebServ_up = True
        print("Listening to local Mic")
        thread2 = threading.Thread(loop.run_until_complete(self.basic_transcribe()))

        #loop.run_until_complete(self.basic_transcribe())
        #loop.run_until_complete(self.launch_flask_server())


        loop.close()
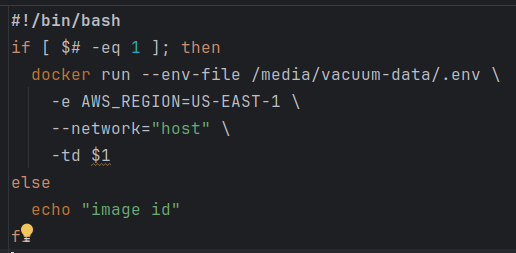
#!/bin/bash
#Check if we have a parameter
if [ $# -eq 1 ]; then
#check if the parameter is a file that exists
if [ -f "$1" ]; then
unzip -o "$1"
rm "$1"
fi
fi
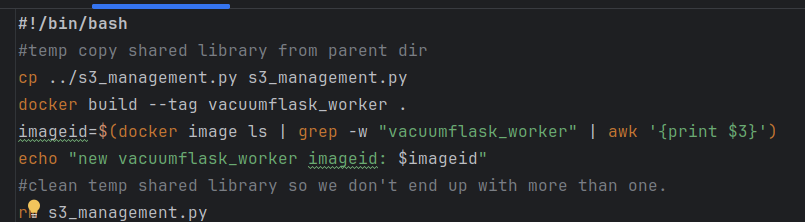
oldimage=$(docker images | grep -w vacuumflask | awk '{print $3}')
newimageid=$(sh build.sh | awk '{print $4}')
runninginstance=$(docker ps | grep -w "$oldimage" | awk '{print $1}')
docker kill "$runninginstance"
sh run.sh
nowrunninginstance=$(docker ps | grep -w "$newimageid" | awk '{print $1}')
docker ps
echo "new running instance id is: $nowrunninginstance"
Welp, the “new” blog is live. It’s running on python 3.12 with the latest build of flask and waitress. This version of my blog is containerized and actually uses a database. A very basic concept I know. I considered running the blog on the elastic container service and also as an elastic beanstalk app. The problem with both of those is that I don’t really need the extra capacity and I already have reserved instances purchased for use with my existing ec2 instances. I’m not sure how well flask works with multiple nodes, I may have to play around with that for resiliency sake. For now we are using apache2 as a reverse https proxy with everything hosted on my project box.
Todo items: SEO for posts, RSS for syndication and site map, fixing s3 access running from a docker container. Everything else should be working. There is also a sorting issue of the blog posts that I need to work out.
This weekend, I spent some time trying to look for patterns in what should be random file names. I started the process by writing some Python to read a text file with the results of an s3 ls command, break the file name into pieces for each character of the file name, and insert it into an SQLite3 database. I used some new-to-me bash techniques for code generation using a command line for loop. Along with an older sql creation by sql. This with the newer execute a command for each file line and I was in business.
#add column numbers
#for f = 1 to 50
#add 50 columns named f1 to f50
for f in {1..50}
do
  sqlite3 fileanalysis.db "alter table files add column f$f text;"
done


#loop for f = 1 to 48:
#loop for dynamic sql insert statements in mass
for f in {1..48}
do
  sqlite3 control.db "insert into file_name_position_charecter_counts (f,charecter) select distinct 'f$f', f$f from files order by f$f";
done

#loop through sql generating sql and run against our sqlite3 database.
while IFS= read -r sql
do
	sqlite3 control.db "$sql" > sqllog.txt
done < control_counts.tsv
--Create update statements to do charecter counts
select 'update file_name_position_charecter_counts set count=(select count(*) from files where '
           || c.f || '=''' || c.charecter || ''') where id = ' || cast(c.id as text)
from file_name_position_charecter_counts c;
This morning I automated my data sync between the old blog and the data storage system for the new one. This will allow me to keep up on how my newer posts will look on the pages I’m building as I slowly replace the existing functionality.
#!/bin/bash
# copy the files from my project box to a local data folder
scp -r project:/var/www/blog/blogdata/ /home/colin/python/blog2/vacuumflask/data/
# read the blog.yml file and export the ids, then remove extra --- values from stream
# and store the ids in a file called blog_ids.txt
yq eval '.id' data/blogdata/blog.yml | sed '/^---$/d' > data/blogdata/blog_ids.txt
# loop through the blog ids and query the sqlite3 database and check and see if they exist
# if they do not exist run the old_blog_loader pythong script to insert the missing record.
while IFS= read -r id
do
  result=$(sqlite3 data/vacuumflask.db "select id from post where old_id='$id';")
  if [ -z "$result" ]; then
    python3 old_blog_loader.py data/blogdata/blog.yml data/vacuumflask.db "$id"
  fi
done < data/blogdata/blog_ids.txt
# clean up blog ids file as it is no longer needed
rm data/blogdata/blog_ids.txt
echo "Done"
After getting chores done for the day I set about working on my new blog engine. This started out with getting flask templates working and after some back and forth that was sorted out. It then set in that I was repeating myself a lot because I skipped an ORM model. So I set about to write a blog class to handle loading, serialization, updates, and inserts. A round of testing later and a bunch of bugs were squashed.
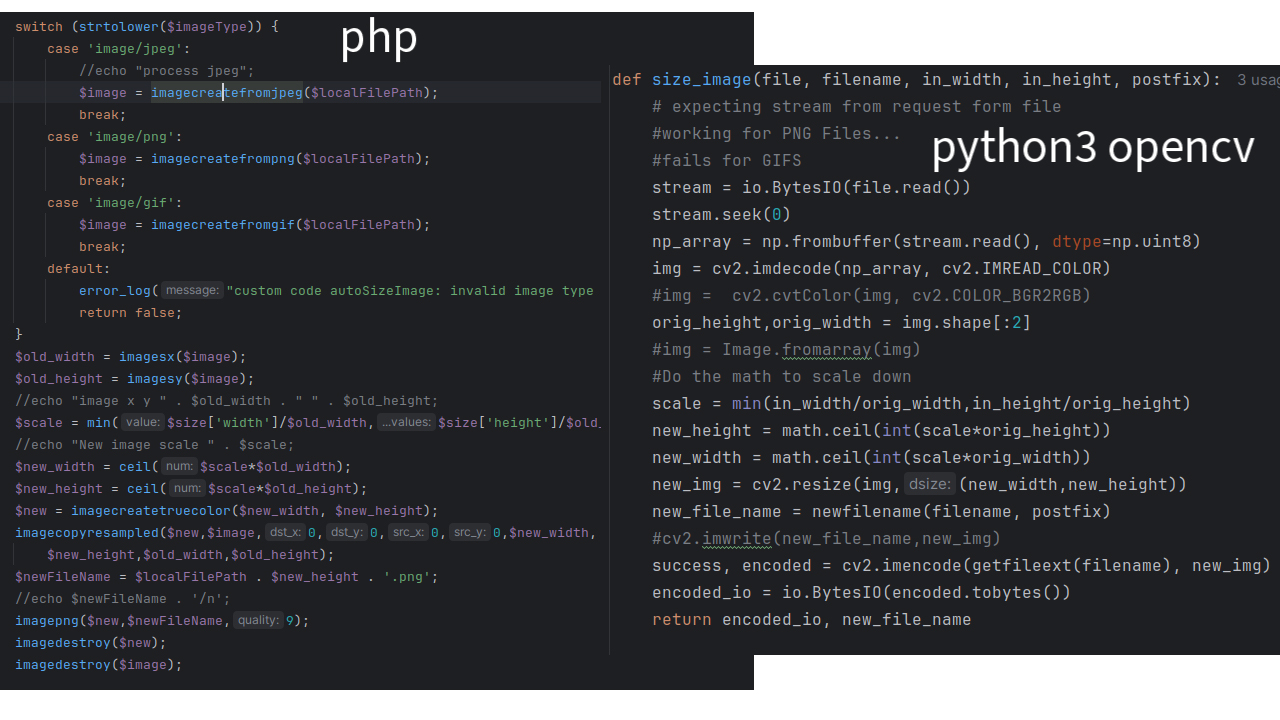
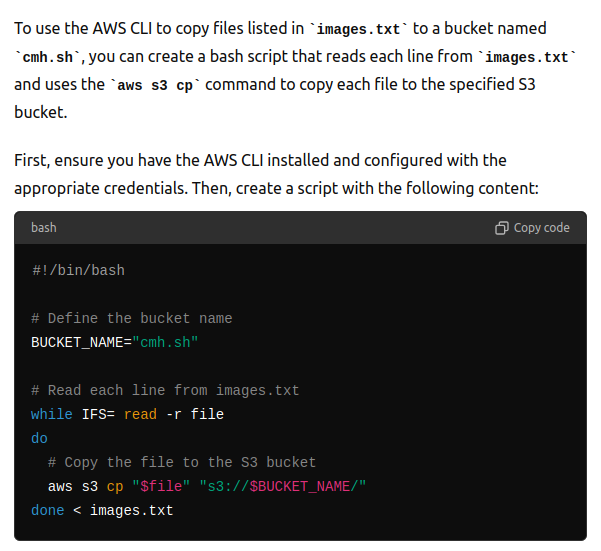
A side quest today was to update all of the image paths from prior blog posts to use my CDN. I ended up using a combination of awk commands [ awk '{print $7}' images.txt > just_images.txt and awk -F '/' '{print $3}' image_names.txt > images2.txt] to get a good list of images to push to the CDN and then asked chatgpt to help me write a bash loop [ while IFS= read -r file; do aws s3 cp "$file" s3://cmh.sh; done < images2.txt ] to copy all the images.
 I’ve seen one of my more Linux savvy coworkers write these loops on the fly and it is always impressive. I streamed the first couple hours of development and encountered a number of bugs with Raphael bot that I’ll see about fixing tomorrow.
Since the weather was suppose to be hotter today and it was suppose to storm throughout the day, I opted to work on my tech projects today. I started the day by streaming my work on Raphael bot, where I quickly was able to fix the issue where Raphael was ignoring me. Next I turned my attention to the scene switching command. After adding several variants to the list of commands I was able to get a demo working quite well on stream and pushed the changes to my GitHub Repository.
With Raphael being in a good place, I turned my attention to my new flask based blog engine. After some troubleshooting I was able to find a problem, and figured out that part of the issue with my curl test commands was that I wasn’t saving the cookie that curl was getting from the login api call. With my curl issues solved, I turned to obscuring my blog user password when calling my curl commands. The last thing I worked on before turning my attention to a discord movie watch party was adding a file upload method to my blog API. With the hours of my Sunday winding down, I turned my attention to the documentation for Raphael since I noticed that someone had started following the repository.
Demo:
Before I finished my Juneteenth holiday break I posted the source code for Raphael bot out on github. I got the voice recognition working and responding in a timely manner. It even outputs it’s voice to obs studio. For some reason I was feeling brave and posted a tik-tok with the video . The next step will be to implement the streaming commands in a manner that allows customization. I also added a readme.md which still has a lot to be desired as I haven’t done any testing outside of Ubuntu 22.04. This weekend I randomly decided to make myself a url shortner for a new domain I acquired. Finished that up today.
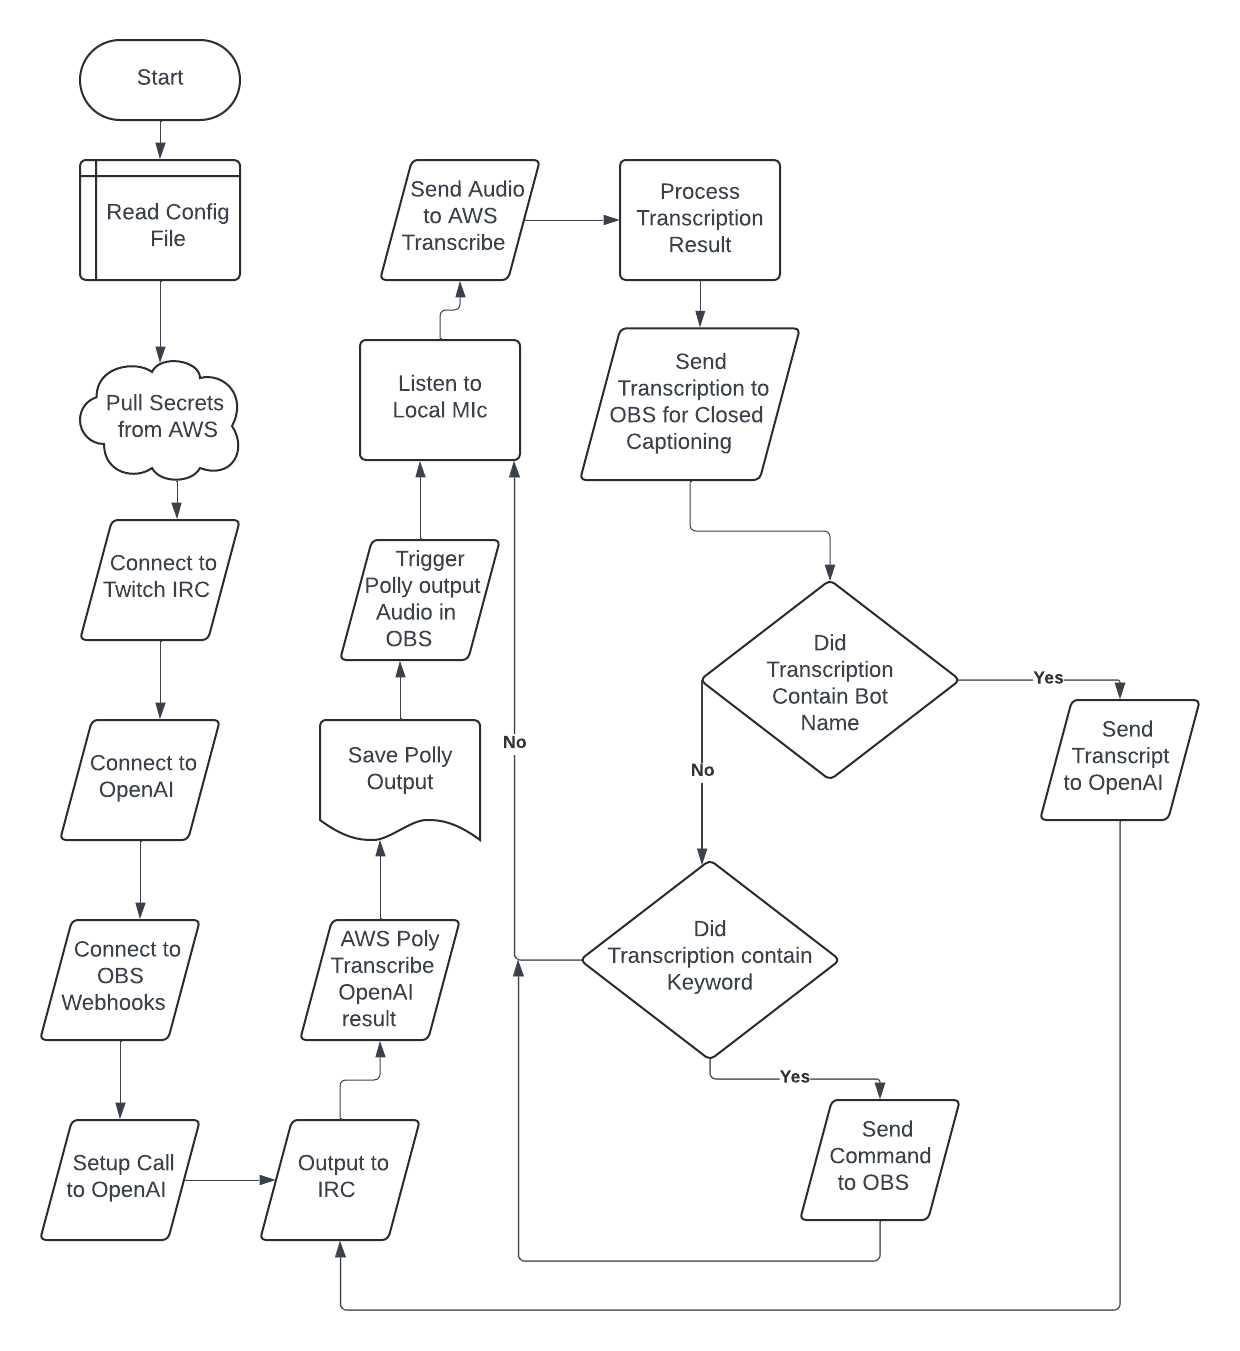
I've been working on a Twitch bot for a couple weeks now. I've got transcription mostly working. So far, I have gotten chat messages going to Twitch chat, and the bot recognizes it's name. When it recognizes its name and calls ChatGPT to answer questions for the streamer.